Direction & Contents
Includes
- Phasm light
- USB charger cable
- Printed ‘Quick Start’ manual
QUICK START GUIDE
- Charge before use. (see charging instructions below)
- Turn device on by pressing and holding the Power Button (6) for 2 seconds.
- Choose your desired light settings using the controls on the back. See below for details on controls.
- Turn device off by pressing and holding the Power Button (6) for 2 seconds.
Troubleshooting Tips: If your Phasm will not turn on and plugging in the charging cable will not show the charging icon, it’s okay. This happens when the battery is so low that it doesn’t have enough power to run the display. But it IS charging. Make sure the cable is pushed in securely. Give it a good push! Let it charge for at least 30 minutes. Then UNPLUG the unit and try to turn it on. It sometimes takes 2-3 tries to wake it back up from a completely dead battery (this is something we’re working on fixing in future adjustments). Phasm should start up and show the display with a charge. If after this process, the Phasm still will not turn on, please give us a call. We may need to supply you with a new charging cable.
DIRECTIONS
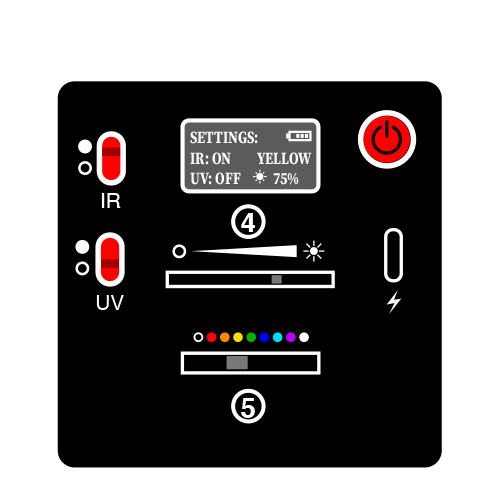
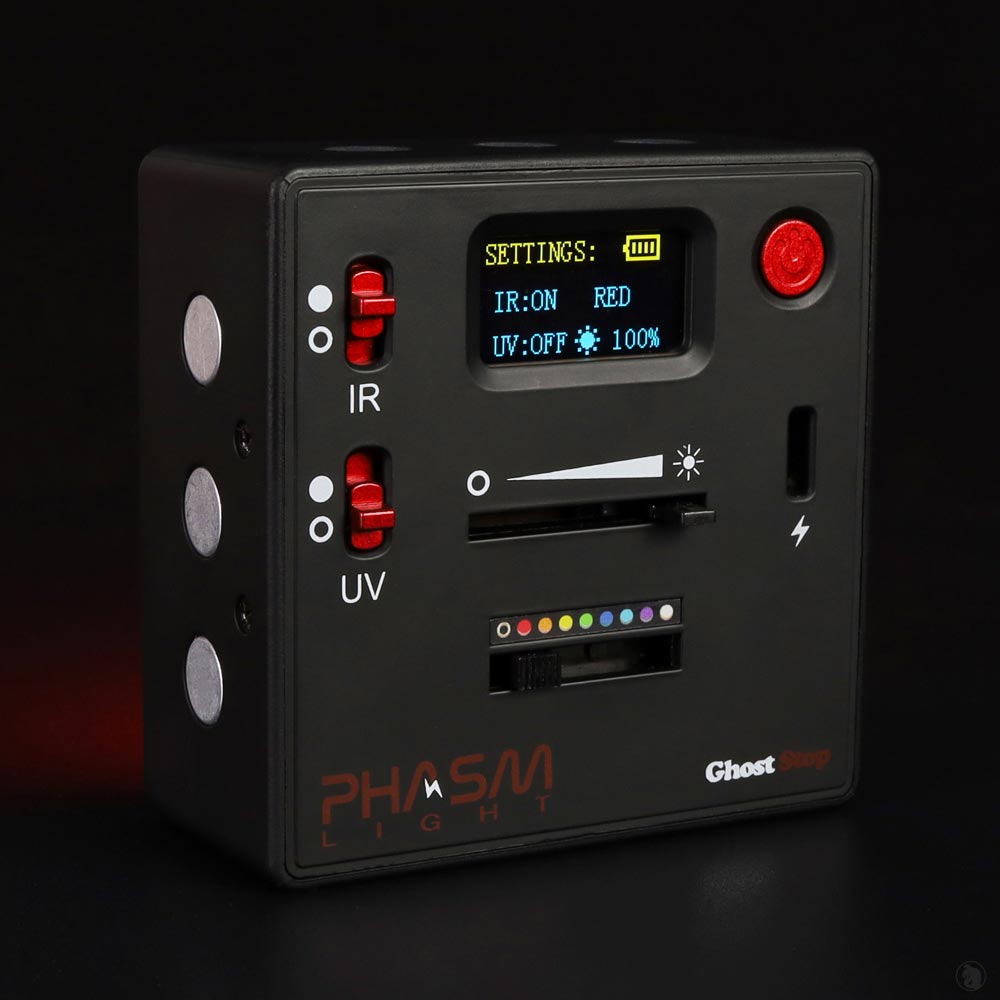
1 IR Switch
2 UV Switch
3 Settings Display Screen
4 Brightness Slider
5 Visible Light Color Switch
6 Power Button
7 USB-C Charging Port
POWER & CHARGING
Phasm is powered by a rechargeable battery. To charge the device use the provided USB-C charging cable to connect to a USB power source. This could be a computer with a USB power, USB power strip or USB battery pack for quick mobile power. When charging the battery icon on the back display will flash one bar. The device is full charging when the battery icon is full bars and solid. To plug the device into a AC power outlet, you will need to use a USB to AC power adapter (not provided).
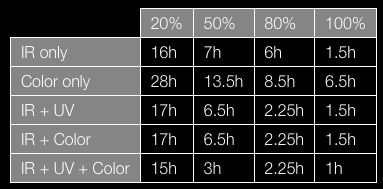
Battery life on Phasm depends greatly on the settings – brightness most of all. To save battery life, adjust the brightness level to what you need for the scene. There will be few cases where you need full 100% to get a good shot. In most residential cases, 20% will likely do just fine and get the most life possible. See the chart below for sample times we have tested to gauge how much life you can get on various settings.
Battery Life Tests (in hours)*
LIGHTING
Phasm utilizes an array of 64 high powered lights including 56 infrared (IR) LEDs, 4 visible color (RGBW) LEDs and 4 ultraviolet (UV).

![]() NOTE: Infrared light is invisible to humans. The infrared (IR) LED lights on this unit emit virtually no visible light. The human eye cannot see infrared light but a proper camera can. You must have a full spectrum or night vision camera that can see infrared light to take advantage of night vision capabilities. For non-IR capable cameras you can use the visible color lighting functions of Phasm Light.
NOTE: Infrared light is invisible to humans. The infrared (IR) LED lights on this unit emit virtually no visible light. The human eye cannot see infrared light but a proper camera can. You must have a full spectrum or night vision camera that can see infrared light to take advantage of night vision capabilities. For non-IR capable cameras you can use the visible color lighting functions of Phasm Light.
CONTROLS
Controls on the back of the device allow independent control over your light to suit the scene.
- IR Switch: Independent control of infrared light on and off.
- UV Switch: Independent control of ultraviolet light on and off.
- Brightness Slider: Allows control of the overall brightness for all light. Slide this bar left to dim or right to brighten.
- Visible Light Color Switch: Allows selection of the visible light color from a selection of 8 colors. Move this switch full left to turn off visible light.
- Power Button: Turn on and off the device by pressing and holding the Power Button for 2 seconds.
DISPLAY SCREEN
A lighted display on the back of the device allow you to see all of your settings at a glance, even in the dark. After 2 minutes of no changes the display will go to sleep to preserve battery life. To wake up the display just tap the power button.
- Battery Life: Battery icon will visually indicated the life of the battery with how many ‘bars’ are charged.
- Charging Status: While charging one of the bars in the battery icon will blink. Once solid and all bars are full the device is fully charged.
- IR Mode: Displays if the IR lights are on or off.
- UV Mode: Displays if the UV lights are on or off.
- Visible Color: Displays the visible light color if in use. If visible color is not selected the display will show ‘OFF’.
- Brightness: Displays overall light brightness selected with a percentage value of 0% – 100%.